During the preparations of my presentation with Hendricus Kramer on NetScaler Automation with Puppet at E2EVC in Lisbon, I used a lot of PowerShell scripts to test the interaction with NetScaler’s NITRO. Where Hendricus is the Puppet Expert, I’m having a lot of fun building PowerShell scripts to automate deployments and common administrative tasks. I’m no PowerShell expert and my code can probably be improved in many ways, it does however get the job done (and offers a great learning experience as I improve with every script I built).
In my previous blogpost I shared my PowerShell script to automatically deploy a NetScaler VPX with a fixed IP-address, so I can now automatically deploy and configure the NetScaler with PowerShell. And even though NITRO offers an API to upload files up to 2 MB, I wanted to ensure I had a standardized script to upload files to the NetScaler, like license files, certificate files and customized conf files for the NetScaler.
So let me share the script I created!
The WinSCP Wrapper
To upload files to the NetScaler with PowerShell I’ve used the WinSCP Module Wrapper, which can be found here. The page will give you clear instructions on how to install the WinSCP Module and provides different examples for the cmdlets it supports. Unfortunately the link to the Windows Management Framework (WMF) 5 is broken, so I searched for a new link to download WMF 5.
The Windows Management Framework (WMF) 5.0
The most easy way to install the WinSCP Wrapper is to install Windows Management Framework 5 and use the Install-Module PowerShell cmdlet that comes with it. You can find a WMF 5 (Preview) download here.
My PowerShell script
So without further ado, here’s my PowerShell script to upload a file (like the sample RootCA.cer file) to a NetScaler:
# To install WinSCP, run the following command in the PowerShell prompt in Administrator mode:
#Install-Module -Name WinSCP

# Import installed module WinSCP (uses WMF5)
Import-Module WinSCP

# Get Credentials with Popup Windows
#$credential = Get-Credential

# Or create a PSCredential from given username and password
$username = "nsroot"                                                                                              # NetScaler username
$password = ConvertTo-SecureString "nsroot" -AsPlainText -Force                                                   # NetScaler password
$credential = New-Object -typename System.Management.Automation.PSCredential -argumentlist $username, $password   # Creating Credentials
$NSHost = "10.1.1.201"                                                                                            # NetScaler Hostname or IP-address
$SshHostKeyFingerprint = "ssh-rsa 2048 xx:xx:xx:xx:xx:xx:xx:xx:xx:xx:xx:xx:xx:xx:xx:xx"                           # Key for SSH session to NetScaler Host

# Create WinSCP session using captured credentials.
$session = New-WinSCPSession -Credential $credential -HostName $NSHost -Protocol Sftp -SshHostKeyFingerprint $SshHostKeyFingerprint

# Upload a file to the directory.
Send-WinSCPItem -WinSCPSession $session -Path 'C:\Install\Certificates\RootCA.cer' -Destination '/nsconfig/ssl/RootCA.cer'

# Close the session object.
Remove-WinSCPSession -WinSCPSession $session
Finding the SSH Host Key Fingerprint
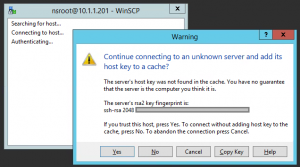
The WinSCP cmdlet needs to prive a SSH Host Key Fingerprint to open the secure FTP session to the NetScaler. You can find the code, by using the (portable) WinSCP tool. When you make your first connection to the NetScaler it will give you a popup with the key fingerprint and allow you to copy it.
This blogpost was created to share the bonus content of the NetScaler Automation presentation by Hendricus Kramer and myself at E2EVC Lisbon.
The following sources have been used to create this post:
WinSCP PowerShell Module Wrapper
Windows Management Framework 5.0 Preview April 2015
