Even though I have a lot of fun creating self-signed certificates with makecert, as described in my previous blogpost it’s not the most modern solution for automating the creation of self-signed certificates. Due to the fact that makecert does use popup windows to configure the passwords for the private key and certificate. So I looked for another way to create a self-signed certificate that could easily be integrated in automation tools and orchestration workflows …
With the release of PowerShell 4.0 and Windows 8 and up you can the use preinstalled PowerShell PKI Module to create a self-signed certificate.
So let’s have some PowerShell fun with certificates!
Working with the PKI Module
To create a self-signed certificate with PowerShell, you can use the Certificate Provider that is included with PowerShell 4.0. as part of the PKI Module. To check of the PKI Module is available on your system, you can use the following commands:
* Check which Modules are loaded in the session:
PS C:\> Get-Module

ModuleType Version    Name                                ExportedCommands
---------- -------    ----                                ----------------
Manifest   3.1.0.0    Microsoft.PowerShell.Management     {Add-Computer, Add-Content, Checkpoint-Computer, Clear-Con...
Manifest   3.0.0.0    Microsoft.PowerShell.Security       {ConvertFrom-SecureString, ConvertTo-SecureString, Get-Acl...
Manifest   3.1.0.0    Microsoft.PowerShell.Utility        {Add-Member, Add-Type, Clear-Variable, Compare-Object...}
Manifest   3.0.0.0    Microsoft.WSMan.Management          {Connect-WSMan, Disable-WSManCredSSP, Disconnect-WSMan, En...
The PKI Module is not loaded by default in a PowerShell session, so let’s ensure it is available on this system.
* Check which Modules are available:
PS C:\> Get-Module -ListAvailable

    Directory: C:\Windows\system32\WindowsPowerShell\v1.0\Modules

ModuleType Version    Name                                ExportedCommands
---------- -------    ----                                ----------------
Manifest   1.0.0.0    DnsClient                           {Resolve-DnsName, Clear-DnsClientCache, Get-DnsClient, Get...
Manifest   3.0.0.0    Microsoft.PowerShell.Security       {Get-Acl, Set-Acl, Get-PfxCertificate, Get-Credential...}
Manifest   1.0.0.0    PKI                                 {Add-CertificateEnrollmentPolicyServer, Export-Certificate...
Script     1.0.0.0    PSDiagnostics                       {Disable-PSTrace, Disable-PSWSManCombinedTrace, Disable-WS...
Binary     1.1.0.0    PSScheduledJob                      {New-JobTrigger, Add-JobTrigger, Remove-JobTrigger, Get-Jo...
Which uses the following syntax:
- ListAvailable: A switch to ensure all available powershell modules on the system are shown.
With Windows 8 and up, the PKI module is available on the system. You only need to load the PKI Module into your PowerShell session.
* Load the PKI Module:
PS C:\> Import-Module PKI
Now that the module is loaded, we can check the available cmdlets that are provided by the module.
* Check the available commands of the PKI Module:
PS C:\> Get-Command -Module PKI
CommandType     Name                                               ModuleName
-----------     ----                                               ----------
Cmdlet          Export-Certificate                                 PKI
Cmdlet          Export-PfxCertificate                              PKI
Cmdlet          Get-Certificate                                    PKI
Cmdlet          Get-PfxData                                        PKI
Cmdlet          Import-Certificate                                 PKI
Cmdlet          Import-PfxCertificate                              PKI
Cmdlet          New-SelfSignedCertificate                          PKI
Cmdlet          Switch-Certificate                                 PKI
Cmdlet          Test-Certificate                                   PKI
The PKI Module does not only provide cmdlets to create, edit and delete certificates, but it also offers a provider that can be used as a PowerShell Drive.
* Check available PowerShell Providers (useable as PowerShell Drive):
PS C:\> Get-PSProvider

Name                 Capabilities                                      Drives
----                 ------------                                      ------
Alias                ShouldProcess                                     {Alias}
Registry             ShouldProcess, Transactions                       {HKLM, HKCU}
Certificate          ShouldProcess                                     {Cert}
* Check whether the Certificate Provider is available:
PS C:\> Get-PSDrive -PSProvider Certificate

Name           Used (GB)     Free (GB) Provider      Root                           CurrentLocation
----           ---------     --------- --------      ----                           ---------------
Cert                                   Certificate   \
* Navigate to the certificate provider:
PS C:\> Set-Location Cert:
PS Cert:\>
* Browse certificate store root:
PS Cert:\> Get-ChildItem

Location   : CurrentUser
StoreNames : {TrustedPublisher, ClientAuthIssuer, Root, MSIEHistoryJournal...}

Location   : LocalMachine
StoreNames : {TrustedPublisher, ClientAuthIssuer, Remote Desktop, Root...}
PS Cert:\>
Creating the Self-Signed certificate
With the basic PowerShell commands available for the PKI module covered, it is time to create a self-signed certificate and be able to import it into a certificate store or export it to a file for future references. So let’s get into the required cmdlets.
* Create a self-signed certificate:
PS C:\> New-SelfSignedCertificate -DnsName "self.signed.cert" -CertStoreLocation Cert:\CurrentUser\My

    Directory: Microsoft.PowerShell.Security\Certificate::CurrentUser\My
Thumbprint                                Subject
----------                                -------
63B2A97053ADB57976DFA97004A44CC6A68F1BE2  CN=self.signed.cert
Which uses the following syntax:
- DnsName: The Subject name of the certificate.
- CertStoreLocation: The Certificate Store where the certificate is placed.
The New-SelfSignedCertificate cmdlet returns the Certificate Object, containing the certificate Thumbprint and Subject. A self-signed certificate is created with a expiration date of exactly 12 months from today.
* View the self-signed certificate in the Local Machine Personal store:
PS C> Get-ChildItem -Path Cert:\LocalMachine\My -DnsName "self.signed.cert"

    Directory: Microsoft.PowerShell.Security\Certificate::LocalMachine\My

Thumbprint                                Subject
----------                                -------
B64C45270EC271E8419D281C014FD4612AEF12B7  CN=self.signed.cert
You can view all certificates in a certificate store if you do not specify the DnsName property.
Exporting the Self-Signed certificate
Creating the self-signed certificate is only the first step, as you probably need a certificate file to bind the certificate to a web server or push it to a client to put it to good use.
* Exporting a certificate from a certificate store as a single DER-encoded certificate:
PS C:\Windows\system32> Export-Certificate -Cert $SelfSignedCert -FilePath C:\Temp\SelfSignedCert.cer -Type CERT

    Directory: C:\Temp

Mode                LastWriteTime     Length Name
----                -------------     ------ ----
-a---         30-8-2015     19:01        817 SelfSignedCert.cer
Which uses the following syntax:
- Cert: Specifies one or more certificates to be exported to a file.
- FilePath: Specifies the location where the exported certificate will be stored.
- Type: Specifies the type of output file for the certificate export. Valid options are CERT|P7B|SST.
The CER file does not contain the private key. It will be sufficient for certificate installations on client devices. To use the certificate with a web server a private key can be required. You can use the command below to export both the certificate and the key into a certificate archive kind of file, like the PFX format.
* Exporting a certificate from a certificate store as a Personal Information Exchange (PFX) file:
PS C:\> Export-PfxCertificate -Cert $SelfSignedCert -FilePath C:\Temp\SelfSignedCert.pfx -Password $certpwd

    Directory: C:\Temp

Mode                LastWriteTime     Length Name
----                -------------     ------ ----
-a---         30-8-2015     19:19       2709 SelfSignedCert.pfx
Which uses the following syntax:
- Cert: Specifies one or more certificates to be exported to a file.
- FilePath: Specifies the location where the exported certificate will be stored.
- Password: Specifies the password used to protect the exported PFX file.
A PFX file is usually protected with a password. To create the password string with PowerShell you can use the following command: ConvertTo-SecureString -String “password” -Force –AsPlainText
* Importing a certificate from a PFX file:
PS C:\> Import-PfxCertificate -CertStoreLocation Cert:\LocalMachine\My -FilePath C:\Temp\SelfSignedCert.pfx -Password $certpwd
Bonus: Bind the certificate to a website hosted by IIS
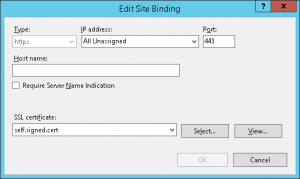
As mentioned before most SSL certificates are used with web sites and servers. You can use PowerShell to bind the certificate to a IIS website as well by using the WebAdministration module.
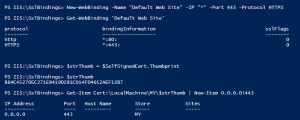
* Binding a certificate to the Default Web Site in IIS:
# Bind the certificate to IIS
Import-Module WebAdministration

# Go to the PowerShell Drive for IIS
Push-Location IIS:\SslBindings

# Bind the HTTPS protocol to the Default Website (listening on all IP addresses)
New-WebBinding -Name "Default Web Site" -IP "*" -Port 443 -Protocol https

# Look at the binding collection using the following command:
Get-WebBinding 'Default Web Site'

# Bind the Self-Signed certificate to the WebBinding
$strThumb = $SelfSignedCert.Thumbprint
Get-Item Cert:\LocalMachine\MY\$strThumb | New-Item 0.0.0.0!443
Pop-Location

|

|
My Certificate creation script
For reference purposes I have included my script:
# Import the PKI PowerShell Module to work with Certificates
Import-Module PKI

# Add the current folder location to the Saved Locations Stack
Push-Location

#region Create Self-signed Certificate
# Create a Self-Signed certifcate in the Local Machine Personal Certificates Store
New-SelfSignedCertificate -DnsName "self.signed.cert" -CertStoreLocation Cert:\LocalMachine\My

# View all certificates in the Local Machine Personal Store
Get-ChildItem -Path Cert:\LocalMachine\My

# Retrieve the Certificate object from the certificate store
$SelfSignedCert = Get-ChildItem Cert:\LocalMachine\My -DnsName "self.signed.cert"
#endregion

#region Export a certificate to file
# Export the certificate as a CER file (no private key)
Export-Certificate -Cert $SelfSignedCert -FilePath C:\Temp\SelfSignedCert.cer -Type CERT

# Retrieve the Certificate object from the certificate store
$SelfSignedCert = Get-ChildItem Cert:\LocalMachine\My -DnsName "self.signed.cert"
# Create a password
$certpwd = ConvertTo-SecureString -String "password" -Force –AsPlainText
# Export certificate as PFX Certificate Archive (cert and key)
Export-PfxCertificate -Cert $SelfSignedCert -FilePath C:\Temp\SelfSignedCert.pfx -Password $certpwd
#endregion

#region Import a certificate from file
$mypwd = ConvertTo-SecureString -String "password" -Force –AsPlainText
Import-PfxCertificate -CertStoreLocation Cert:\LocalMachine\My -FilePath C:\Temp\SelfSignedCert.pfx -Password $certpwd

#Return to previous folder location
Pop-Location
#endregion

#region Bind a certificate to a IIS Website
# Bind the certificate to IIS
Import-Module WebAdministration

# Go to the PowerShell Drive for IIS
Push-Location IIS:\SslBindings

# Bind the HTTPS protocol to the Default Website (listening on all IP addresses)
New-WebBinding -Name "Default Web Site" -IP "*" -Port 443 -Protocol https

# Look at the binding collection using the following command:
Get-WebBinding 'Default Web Site'

# Bind the Self-Signed certificate to the WebBinding
$strThumb = $SelfSignedCert.Thumbprint
Get-Item Cert:\LocalMachine\MY\$strThumb | New-Item 0.0.0.0!443

#Return to previous folder location
Pop-Location
#endregion
The following sources have been used to create this post:
TechNet – Export-Certificate
TechNet – Export-PfxCertificate
Working with certificates in PowerShell
WindowsITPro – Creating Self Signed Certificates with PowerShell