In the first part of this series I explained how you can create layers and assign shapes to each layer to toggle the visibility of them as you manage your layers. The second part explained how you can use the Developer tab to add a command button to your drawing and even create custom User Forms using VBA. So now it is time to get to the final part of this series and explain the VBA code that gets all components to work together and offer users a simple interface to toggle the visibility of the layers.
So let’s get back to the VBA Window and explain the code
Explaining the code
The used code is divided over two parts, first there’s the code for ThisDocument, which contains all the code for the document and command button. This code defines the actions that are perform when the drawing is opened and when user clicks on the command button. The second part is the code for the User Form we created and will be explained lateron. To keep the code to a minimum, I’ve created some reusable functions and declared some constants. I’ll walk you through each step of the code and explain the parts you can easily adjust for your own drawing and layers.
ThisDocument code
The code starts with the declaration of two constants that represent the selection of a layer property to address (I’m only using Visible and Print, not the other properties like Active, Snap and Glue).
Const conVisible As Integer = 0
Const conPrint As Integer = 1
If you want users to also set other properties, feel free to add more constants to the code.
I’ve created a function to check the current configuration of each layer’s property (only Visible and Print implemented), so I’ll know whether a select box on my form needs to be selected or not.
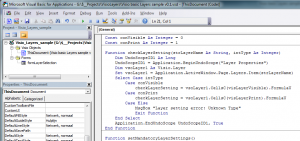
Function checkLayerSetting(strLayerName As String, intType As Integer)
    Dim UndoScopeID1 As Long
    UndoScopeID1 = Application.BeginUndoScope("Layer Properties")
    Dim vsoLayer1 As Visio.Layer
    Set vsoLayer1 = Application.ActiveWindow.Page.Layers.Item(strLayerName)
    Select Case intType
        Case conVisible
            checkLayerSetting = vsoLayer1.CellsC(visLayerVisible).FormulaU
        Case conPrint
            checkLayerSetting = vsoLayer1.CellsC(visLayerPrint).FormulaU
        Case Else
            MsgBox "Layer setting error: Unknown Type"
            Exit Function
    End Select
    Application.EndUndoScope UndoScopeID1, True
End Function
Again I’ve only implemented the properties Visible and Print for a layer, so feel free to add more options when needed.
The second function I’ve added to this code is a function to set some mandatory configuration settings in case you want some Visio layers to always be visible or never to be printable.
Function setMandatoryLayerSettings()
    Dim UndoScopeID1 As Long
    UndoScopeID1 = Application.BeginUndoScope("Layer Properties")
    Dim vsoLayer1 As Visio.Layer
    Set vsoLayer1 = Application.ActiveWindow.Page.Layers.Item("Info")

    vsoLayer1.CellsC(visLayerVisible).FormulaU = "1"
    vsoLayer1.CellsC(visLayerPrint).FormulaU = "0"

    Application.EndUndoScope UndoScopeID1, True
End Function
I personally wanted to make sure the Info layer I created in my drawing (explaining the function of the command button) would always be visible when opening the drawing, but never be printed.
So now all that is left for this part is making sure the created functions are called when I click on the Command Button or open the drawing.
I have used the default Private Subs VBA offers and added the code to each Sub to call upon the previously created functions.
Private Sub btnLayerSelection_Click()

    'Layer01 layer settings
    formLayerSelection.chkVisLayer01.Value = checkLayerSetting("Layer01", conVisible)
    formLayerSelection.chkPrtLayer01.Value = checkLayerSetting("Layer01", conPrint)

    'Layer02 layer settings
    formLayerSelection.chkVisLayer02.Value = checkLayerSetting("Layer02", conVisible)
    formLayerSelection.chkPrtLayer02.Value = checkLayerSetting("Layer02", conPrint)

    formLayerSelection.Show
End Sub

Private Sub Document_DocumentOpened(ByVal Doc As IVDocument)
    'Info layer settings
    Call setMandatoryLayerSettings

    'Layer01 layer settings
    formLayerSelection.chkVisLayer01.Value = checkLayerSetting("Layer01", conVisible)
    formLayerSelection.chkPrtLayer01.Value = checkLayerSetting("Layer01", conPrint)

    'Layer02 layer settings
    formLayerSelection.chkVisLayer02.Value = checkLayerSetting("Layer02", conVisible)
    formLayerSelection.chkPrtLayer02.Value = checkLayerSetting("Layer02", conPrint)

    formLayerSelection.Show
End Sub
As you might have noticed, you will need to define each layer property (Visible and Print) individually with my code, but this only has to be done once and you can quickly copy and paste the existing code for new layers you are introducing to the drawing. I’ve only defined two layers for the sample file, so only have those lines included in the file.
Notice how I only call the mandatory settings when the document is opened and not when the User Form is opened by your user. After all the User Form does not have a Info layer defined upon it to change the properties of that layer.
UserForm code
For each layer the user can change it’s properties, you’ll need a line on your user form. Each check box needs to present the current setting of the layer property, so for the form I created one function that can check the current setting for the check box by checking a part of the name of that check box (that holds part of the Layer property it presents).
Function setLayerValue(ByVal oCheckbox As Object)
    Dim strCResult As String
    Dim strCName As String
    Dim blnCValue As Boolean
    Dim strLName As String
    Dim intLength As Integer

    strCName = oCheckbox.Name
    blnCValue = CBool(oCheckbox.Value)

    'Errorhandling
    If Not (IsNull(strCName)) Then
        intLength = CInt(Len(strCName) - 6)
        strLName = Right(strCName, intLength)

        Dim UndoScopeID1 As Long
        UndoScopeID1 = Application.BeginUndoScope("Layer Properties")
        Dim vsoLayer1 As Visio.Layer
        Set vsoLayer1 = Application.ActiveWindow.Page.Layers.Item(strLName)

        If (Left(strCName, 6) = "chkVis") Then
            'set Layer visibility setting
            If blnCValue = True Then vsoLayer1.CellsC(visLayerVisible).FormulaU = "1" Else vsoLayer1.CellsC(visLayerVisible).FormulaU = "0"
            'Debugging
            'MsgBox "Visibility set for " & strLName & " set to " & blnCValue
        End If
        If (Left(strCName, 6) = "chkPrt") Then
            'set Layer printability setting
            If blnCValue = True Then vsoLayer1.CellsC(visLayerPrint).FormulaU = "1" Else vsoLayer1.CellsC(visLayerPrint).FormulaU = "0"
            'Debugging
            'MsgBox "Printability set for " & strLName & " set to " & blnCValue
        End If
        Application.EndUndoScope UndoScopeID1, True
    Else
        MsgBox "Layer Value error: Unknown Layer name"
    End If
End Function
You can easily extend the function with additional layer properties as I’ve only implemented the Visible and Print properties.
With this function the line of code to add to the Private Sub for each check box is reduced to one line.
Private Sub chkVisLayer01_Click()
    Call setLayerValue(formLayerSelection.chkVisLayer01)
End Sub

Private Sub chkPrtLayer01_Click()
    Call setLayerValue(formLayerSelection.chkPrtLayer01)
End Sub

Private Sub chkVisLayer02_Click()
    Call setLayerValue(formLayerSelection.chkVisLayer02)
End Sub

Private Sub chkPrtLayer02_Click()
    Call setLayerValue(formLayerSelection.chkPrtLayer02)
End Sub
You will however need to define this for each check box on your User Form.
And last but not least I’ve made sure the User Form would be closed when a user clicks on the OK button on the form with the following code:
Private Sub btnOK_Click()
    Unload Me
End Sub
And to offer you a quick start to create your own layered visio drawings and offer users a simple interface to toggle their own view I’ve added a sample file for you to download to this post.
[wpfilebase tag=file id=2 /]
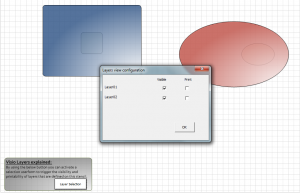
Which presents you with two layers that you can toggle:
I hope you’ll have fun creating new views and layers for your visio drawings.
This post is part of a serie of 3 posts to fully cover the Use of Visio layers to create custom views:
Using Visio layers to create custom views (part 1)
Using Visio layers to create custom views (part 2)
Using Visio layers to create custom views (part 3)


Pingback: virtuEs.IT
Pingback: virtuEs.IT
Pingback: Rory Monaghan
Pingback: Using Visio layers to create custom views (part 2) « virtuEs.IT
Pingback: Microsoft Visio
I have problems when I share the Visio. It works fine on my desktop but gets stuck on the line below
intLength = CInt(Len(strCName) – 6)
(that line is yellow)
Any ideas? It works fine on another coleges laptop as well.??
Hello Richard,
That line of code assumes you are using checkbox names that are at least 6 characters long (and start with chkVis or chkPrt) I do admit I did not include error handling for situations that use checkbox names that are less that 6 characters long.
I find it weird that it doe work on a colleague’s laptop, but not when shared, other than the fact that an older version of Visio or a different language GUI used (that doesn’t recognize the standard function used). Can you check whether VBA is installed during setup of Visio?